BMW X5 - How to Replace the Serpentine Belt
Only problem area might be getting fan off water pump and getting tension on new belt a bit tricky.
it has 2 belts: serpentine and air conditioning (AC).
When either belt shows cracks in the belt ribs, time to replace.
Tools required:
30 millimeter (mm) thin wrench. I get thin wrenches from bicycle stores.
9mm socket or wrench
10mm socket or wrench.
13mm socket.
17mm socket.
2 ratchets or a ratchet and a breaker bar.
Long flat blade screw driver.
Flashlight or shop work light.
Getting old serpentine belt off:
Park on flat, well lit place.
There is no need to jack up the car.
Open hood and use a stick to prop it up. Hood should stay up on its own, but you do not want it to come crashing down on you while you leaning over engine.
Under front of car, remove plastic shield that extends from bumper backward to the skid plate. This shield is held in place with 9 and 10mm fender screws. After removing all, put into a box. A lost fender screw could rake havoc on a tire.
Remove fan on water pump. Fan nut is 30mm and this is where you need a thin wrench. The fan is reverse threaded such that to remove fan, you move nut to the right or clockwise. In my case, the fan nut was on so tight, I had to wedge a long flat blade screw driver between 2 bolt heads on the water pulley and hold the pulley while trying to turn the fan nut. The fan nut thin wrench might even need a tap or 2 from a rubber mallet or hammer. Once fan nut is loose, slowly unthread the fan from the water pump until it comes off.Do not let it drop. Once removed, sit it against the radiator out of the way.
Use your work light or flashlight to locate the serpentine belt tensioner. Standing in front of the car, the serpentine belt tensioner is just to the right of the water pump pulley and down and is bolted to the front of the engine. Look for a large nut wielded to a plate with a 13mm bolt head.
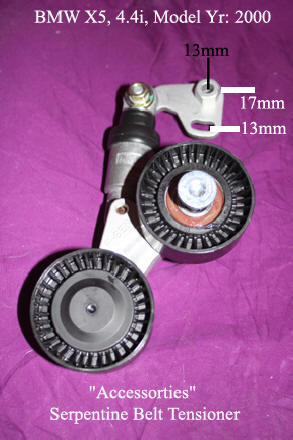
Using a socket and ratchet, loosen but do not remove, the 13mm nut that goes through the larger 17mm wielded nut.
Place 13mm socket on 13mm bolt that goes through tensioner plate and slow relieve tension on the belt by moving the bolt counterclockwise. At some point, you may feel or hear a pop as tension is removed from the serpentine belt. This bolt is just below and to the left of the large 17mm nut.
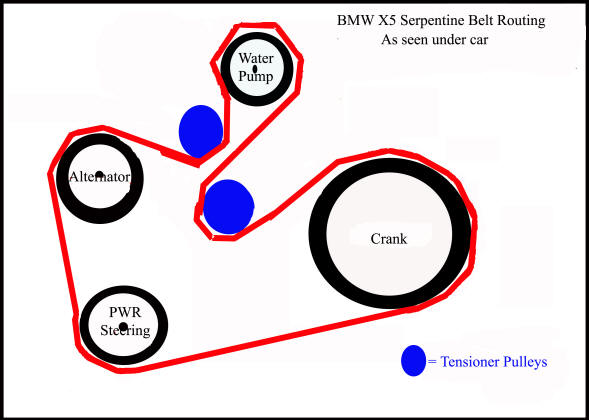
Go to front of car and crawl under so you can see the serpentine belt. Compare belt routing to image provided below and if incorrect make a copy of the image below and edit it for your specific situation.
Make sure you know how the serpentine belt is routed before you take it off.
Now go under front of car and attempt to remove the serpentine belt. In my case, could not get it free enough to remove without removing completely the 13mm bolt through the tensioner plate. Once this bolt removed, easy belt removal.
Getting new serpentine belt on and tensioned:
The new belt should go on all pulleys easily.
Once you have your new serpentine belt installed, double check routing around pulleys.
If you removed bracket bolt, reinsert but do not tighten down just yet.
To get tension on the new belt, what you are going to do is place a 17mm socket over the large wielded nut on the tensioner plate and connect socket to either a breaker bar or a long handled ratchet.

With the 17mm in place, now place a 13mm socket over the bolt that goes through the tensioner plate.
Now push counterclockwise on the large 17mm nut until you feel movement of the tensioner spring and then tighten, clockwise, the 13mm bolt through the tensioner plate.
Initially, I cranked the 17mm nut all the way over such the the small shock absorber was fully compressed but this did not seem right to me, so I backed off and now have the shock absorber compressed about half way.
After you have the 13mm bolt though the bracket tight (40 foot pounds), crawl under car and check belt tension. It should not have more than 1\4 inch of slack or flex.
If your belt is tight enough, place 13mm socket on bolt that goes through 17mm nut and tighten it down to 40 foot pounds.
Again, double check belt routing around pulleys.
Reinstall fan on water pump. Again, this fan is reverse threaded, so you lift fan up and try to get it to thread in a clockwise direction. Get the fan to start to thread and be a little difficult and if you are having problems, walk away and take a break.
Once fan is on water pump, use long flat blade screwdriver wedged between 2 bolts of the water pump pulley while tightening the fan bolt with the 30mm thin wrench.
Check everything. No tools left on top of engine? No tools dropped down on sides of engine? All correct underneath car?
Start car.
If all appears well, reattach plastic shield to front of car. Which hole gets which size screw, 9 or 10mm, is confusing so try a screw and if it does not draw tight, try larger size.
If you want to leave front plastic shield off car for a while and drive it around to confirm serpentine belt is fine, ok, but attach portion of fender cover at each end of bumper to the bumper. If you do not do this, the ends can flap and rub against a tire and wear a hole in the fender cover.
Replace AC belt:
Because the AC belt sits in behind the serpentine belt on the crankshaft, a good time to replace the AC belt is when you do the serpentine belt.
No comments:
Post a Comment