2007 bmw 650i Ac compressor belt replacement
How to replace A/c Compressor Belt
Does require removal of serpentine belt and thus re-tensioning the serpentine belt.
It has 2 belts: a serpentine belt for "accessories" and air conditioning compressor drive belt.
When either belt begins to show cracks in belt ribs, time to replace.
Tools to get serpentine belt off.
17mm wrench or 17mm socket and ratchet.
13mm wrench or 17mm socket and ratchet.
Removing old AC belt:
As AC belt sits in behind serpentine belt on crankshaft, the serpentine belt must be removed or at least taken off the crankshaft to replace the AC belt. See "How to Replace the Serpentine Belt" for instructions on how to remove the serpentine belt.
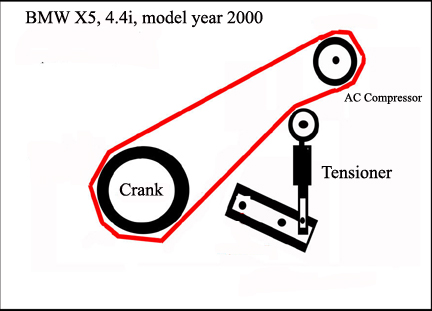
With serpentine belt off crankshaft, under the car, looking up on the right, you will see the AC belt going around the crankshaft, over a tensioner pulley and then around the AC compressor.
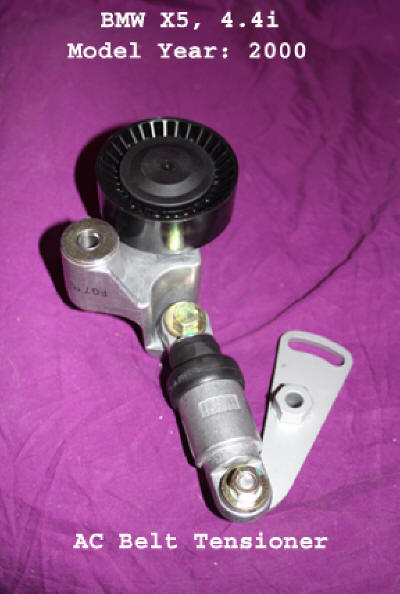
To remove tension from the AC belt, you use a place a 13mm socket over the bolt in the tensioner plate that is in a slot. Turning the bolt counterclockwise, the plate should begin to rotate and tension come off the belt.
If when you unscrew the plate 13mm bolt, tension does not come off the belt, place a 13mm socket on the bolt going through the 17mm nut wielded to the tensioner plate and turn it counterclockwise.
Before you remove AC belt, look at how belt goes around AC pulley. All grooves filled with belt ribs? One extra groove in pulley?
See the Sample image shown below:

The routing of the AC belt is straight forward. Around the inner grooves of the crankshaft and then around the inner grooves on the AC compressor pulley.

Note here that I had belt installed when I noticed there is one more groove on the AC compressor pulley than ribs in the belt! So I loosened tension and moved belt off AC pulley and could clearly see that belt sits flush against the pulley leave the outer most groove empty. I do not know if your AC pulley one additional groove or not, but check when you install belt.
With new belt in place, take 17mm wrench or socket and ratchet and place on 17mm nut wielded to tensioner plate.
Place 13mm socket over bolt going through tensioner plate.
Now move the 17mm wielded nut counterclockwise, compressing the spring in the tensioner. About half compression should be fine and once you have spring compressed, tighten the 13mm bolt going through the tensioner plate. 40 foot pounds of torque should be sufficient.
When you release the 17mm nut, the belt tensioner should not move.
Now place 13mm socket over bolt going through 17mm wielded nut and tighten to 40 foot pounds of torque.
Place serpentine belt back around crankshaft and see again "How to Replace the Serpentine Belt" on how to tension the serpentine belt.
Once you have both belts installed and properly tensioned, reinstall the fan on the water pump.
Check everything over. No tools left on top of engine? No tools on sides of engine? Serpentine belt routing look correct.
Start car.
If all is good, replace plastic cover from bumper to skid plate.
No comments:
Post a Comment