ABS CONTROL MODULE REPLACEMENT GUIDE
Customers Who Noticed Problem With ABS Module Also Asked This Questions
anti lock brake moduleanti lock brake module repairabs control module symptomschevy abs module repairabs control module problemstrailer brake control moduleabs module locationabs control module autozone
ABS Brake Light On After Wheel Bearing Replacement
How to Replace an ABS Control Unit
2004 Nissan quest ABS Module Replacement
Removal and InstallationREMOVAL
CAUTION:- Before servicing the SRS, turn the ignition switch off, disconnect both battery cables and wait at least 3 minutes .
- Disconnect the harness connectors for each air bag module and seat belt pre-tensioner.
- Remove center console lower cover.
- Disconnect diagnosis sensor unit harness connectors.
- Remove fixing bolts from the diagnosis sensor unit.
CAUTION:- Do not use old bolts; replace with new bolts.
- Check diagnosis sensor unit bracket to ensure it is free of deformities, dents, cracks or rust. If it shows any visible signs of damage, replace with new one.
- Replace diagnosis sensor unit if it has been dropped or sustained an impact.
INSTALLATION
To install, reverse the removal procedure.- After the work is completed, perform self-diagnosis to check that no malfunction is detected. Refer to "SRS Operation Check".
CAUTION:- The diagnosis sensor unit must always be installed with the arrow mark "<=" pointing toward the front of the vehicle for proper operation.
ECU DISCRIMINATED NO.
After replacing the diagnosis sensor unit, confirm that the diagnosis sensor unit identification is correct for the vehicle as equipped. Refer to "DIAGNOSIS MODE USING CONSULT-II".


Safety Tip:
Always wear safety glasses when working on your vehicle. Wear other personal protective equipment (PPE) when necessary, for example latex gloves or closed toe shoes.
1Locate your vehicles OBD connection.2Plug your scan tool into the OBD connection with the key in the ON position.
 Photo may not be specific to your vehicle3Gather all trouble codes and refer to a vehicle specific service manual for a trouble code index that directs you to the specific component.4Disconnect your vehicle's negative cable.
 Photo may not be specific to your vehicle5Locate your ABS control module on the driver's side front corner of the engine compartment.
 Photo may not be specific to your vehicle
 Photo may not be specific to your vehicle6Disconnect (unplug) the wiring from the ABS control module.7Use the appropriate tools to remove the mounting bolts that hold the ABS control module in place.8Remove the failed module and replace with the new unit.9Plug in the wiring terminal back into the brake ABS module.10Reconnect the negative cable to the battery.11Road test the vehicle. Multiple styles of driving such as full throttle, idle and deceleration are recommended in order for the brake ABS module to relearn proper commands.12Be sure to clear all codes present.13Turn off the vehicle.14Turn on the vehicle.
15Check your scanner connection for any codes remain present.The following is an ABS control module replacement guide on:
2000 to 2006 Chevy Suburban, Tahoe, Silverado, GMC Yukon and Cadillac Escalade
The ABS (antilock brake skid) controller or computer is responsible for limiting the brake line pressure which allows a wheel or wheels that have locked up to start rotating under severe braking conditions which helps keep the vehicle under control in a hard braking or skid event. Every vehicle equipped with an this system has a computer module controller that can go bad as parts sometimes do which casus the ABS warning light to be on.
Please follow this video and article to determine if your module has failed by process of elimination.
Also See: ABS Warning Light On Repair
Watch the video below then continue with the guide to gain additional tips and updated information
ABS Brake Light On After Wheel Bearing Replacement
How to Replace an ABS Control Unit
2004 Nissan quest ABS Module Replacement
Removal and Installation
REMOVAL
CAUTION:
CAUTION:
- Before servicing the SRS, turn the ignition switch off, disconnect both battery cables and wait at least 3 minutes .
- Disconnect the harness connectors for each air bag module and seat belt pre-tensioner.
- Remove center console lower cover.
- Disconnect diagnosis sensor unit harness connectors.
- Remove fixing bolts from the diagnosis sensor unit.
CAUTION:
- Do not use old bolts; replace with new bolts.
- Check diagnosis sensor unit bracket to ensure it is free of deformities, dents, cracks or rust. If it shows any visible signs of damage, replace with new one.
- Replace diagnosis sensor unit if it has been dropped or sustained an impact.
INSTALLATION
To install, reverse the removal procedure.
To install, reverse the removal procedure.
- After the work is completed, perform self-diagnosis to check that no malfunction is detected. Refer to "SRS Operation Check".
CAUTION:
- The diagnosis sensor unit must always be installed with the arrow mark "<=" pointing toward the front of the vehicle for proper operation.
ECU DISCRIMINATED NO.
After replacing the diagnosis sensor unit, confirm that the diagnosis sensor unit identification is correct for the vehicle as equipped. Refer to "DIAGNOSIS MODE USING CONSULT-II".
After replacing the diagnosis sensor unit, confirm that the diagnosis sensor unit identification is correct for the vehicle as equipped. Refer to "DIAGNOSIS MODE USING CONSULT-II".
Always wear safety glasses when working on your vehicle. Wear other personal protective equipment (PPE) when necessary, for example latex gloves or closed toe shoes.
1
Locate your vehicles OBD connection.
2
Plug your scan tool into the OBD connection with the key in the ON position.
Photo may not be specific to your vehicle
Photo may not be specific to your vehicle3
Gather all trouble codes and refer to a vehicle specific service manual for a trouble code index that directs you to the specific component.
4
Disconnect your vehicle's negative cable.
Photo may not be specific to your vehicle
Photo may not be specific to your vehicle5
Locate your ABS control module on the driver's side front corner of the engine compartment.
Photo may not be specific to your vehiclePhoto may not be specific to your vehicle6
Disconnect (unplug) the wiring from the ABS control module.
7
Use the appropriate tools to remove the mounting bolts that hold the ABS control module in place.
8
Remove the failed module and replace with the new unit.
9
Plug in the wiring terminal back into the brake ABS module.
10
Reconnect the negative cable to the battery.
11
Road test the vehicle. Multiple styles of driving such as full throttle, idle and deceleration are recommended in order for the brake ABS module to relearn proper commands.
12
Be sure to clear all codes present.
13
Turn off the vehicle.
14
Turn on the vehicle.
15
Check your scanner connection for any codes remain present.
2000 to 2006 Chevy Suburban, Tahoe, Silverado, GMC Yukon and Cadillac Escalade
The ABS (antilock brake skid) controller or computer is responsible for limiting the brake line pressure which allows a wheel or wheels that have locked up to start rotating under severe braking conditions which helps keep the vehicle under control in a hard braking or skid event. Every vehicle equipped with an this system has a computer module controller that can go bad as parts sometimes do which casus the ABS warning light to be on.
Please follow this video and article to determine if your module has failed by process of elimination.
Also See: ABS Warning Light On Repair
Watch the video below then continue with the guide to gain additional tips and updated information
BEGIN REPAIR GUIDE
Most ABS diagnostic codes can be access by the ALDL connector much like the engine control system, but this takes a specialized code scanner with the capability to read such codes. If the vehicle is equipped with a traction control system it uses a different ABS computer which are not interchangeable with non-traction controlled vehicles.
When this module fails it can do so in a few different ways one of the most common problems is the control relay that is built into the unit to fail either by not closing which delivers electrical power to the computer circuitry, or the relay will not disengage which leaves the unit on even with the ignition key off, which will drain the battery down.
This relay is internal inside the controller, but I have heard of people opening them up and just replacing the relay though it takes some soldering on the circuit board. If you do not feel comfortable doing this simply get a replacement factory replacement you can get them from Amazon for about $190.00. The dealer or repair garage will charge about $450 to $550 for the same job (parts and labor).
The unit can fail because one of the control valve activation coils has burned out which leaves only three out of the four wheels to be controlled hence the light being on. The computer control module appearances may vary, but follow the same steps. This article pertains to many Chevy trucks and SUV's, this particular repair was done on a Chevy Tahoe.Before we begin, you will need to locate the module which is usually under the vehicle or in the engine compartment. If it's not located in the engine compartment it will be under the vehicle on the frame rail on the driver’s side, this location is used mostly on trucks and SUV's. If it is in this location you will need a jack to lift up the vehicle to get to it.
Replacing the module is not too difficult and should take you about an hour, are you ready to change your own part and save some cash? Begin the repair by parking your vehicle on level ground with the transmission in park and the emergency brake set. Remove the battery cable from the negative terminal of the battery. Lets get started!
TOOLS AND SUPPLIES YOU WILL NEED:
- Replacement ABS brake control module assembly
- Socket set including Torx bits
- Wrench set
- Screw driver set
- Shop towels
- Protective eye wear and gloves
- Replacement ABS brake control module assembly
- Socket set including Torx bits
- Wrench set
- Screw driver set
- Shop towels
- Protective eye wear and gloves
STEP 1
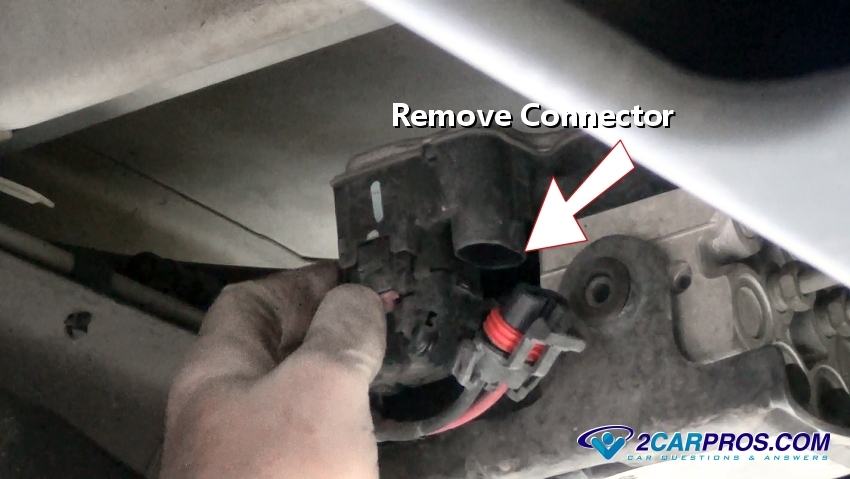
Once the module is located and with negative battery cable disconnected, release the electrical connectors from the unit by pushing the connector’s safety using a small screwdriver. One connector will be for the main power and ground for the unit while the opposing connector will be sensor inputs and data bus wiring to the main ECM computer that controls the warning light itself.
The weather packing can make it a little difficult to remove sometimes so wiggle the connectors as you gently pull on them to remove.

The weather packing can make it a little difficult to remove sometimes so wiggle the connectors as you gently pull on them to remove.
STEP 2
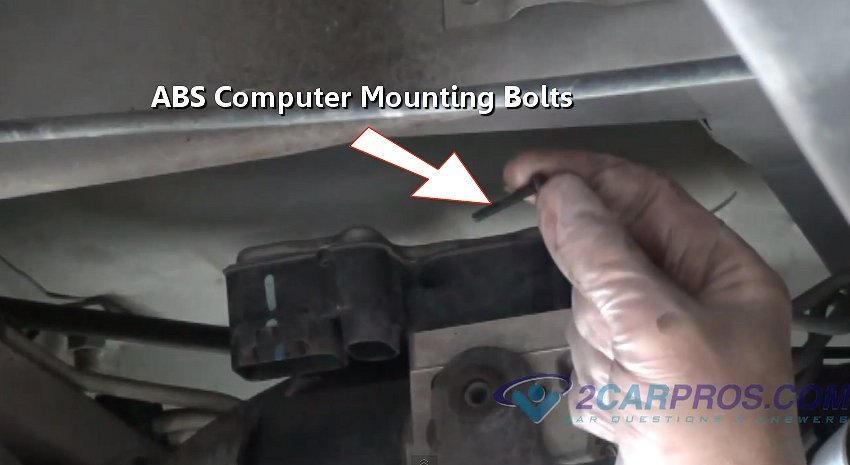
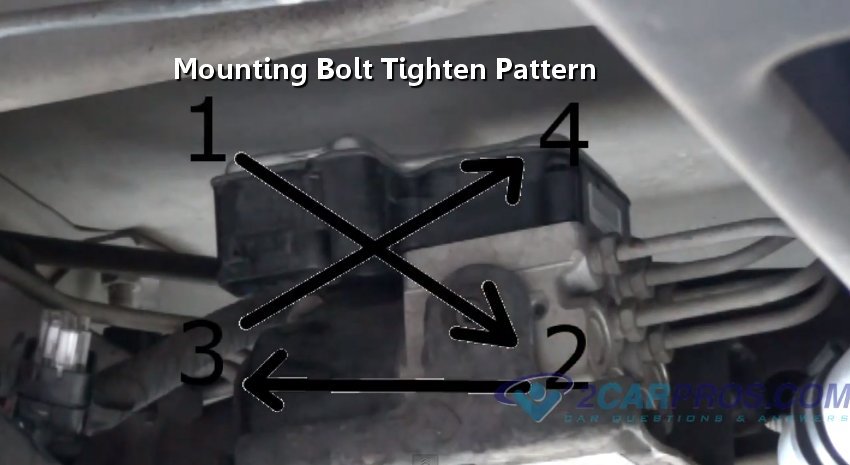
After removing the electrical connectors, it's time to remove the controller mounting bolts which will probably be four Torx head bolts that can be little tough to get to if the module is under the vehicle like this one is, use 1/4 inch drive tools because they are smaller and easier to maneuver. This operation is much easier when the controller is under the hood.

STEP 3
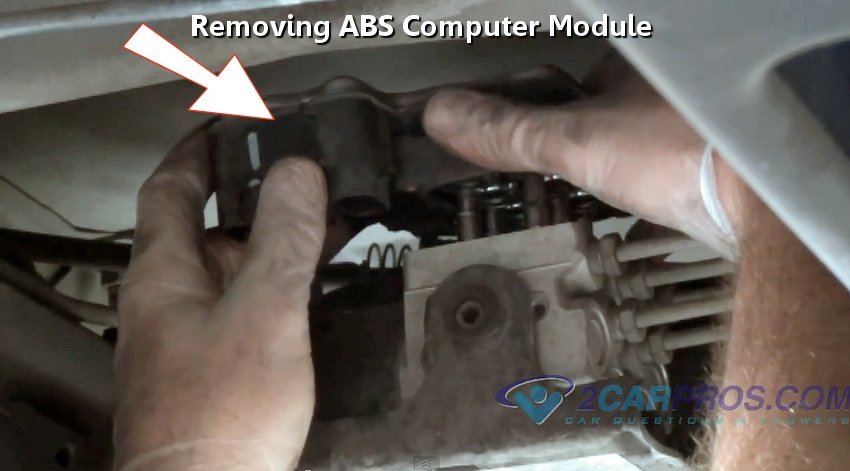
Make sure the controller is clean and dry and then gently remove it by lifting straight up from the valve assembly. It might be a little stuck because of the weather seal so use a small screwdriver to gently pry and separate to help remove it. At this point it sometimes can pop up so keep your hands on it.

STEP 4
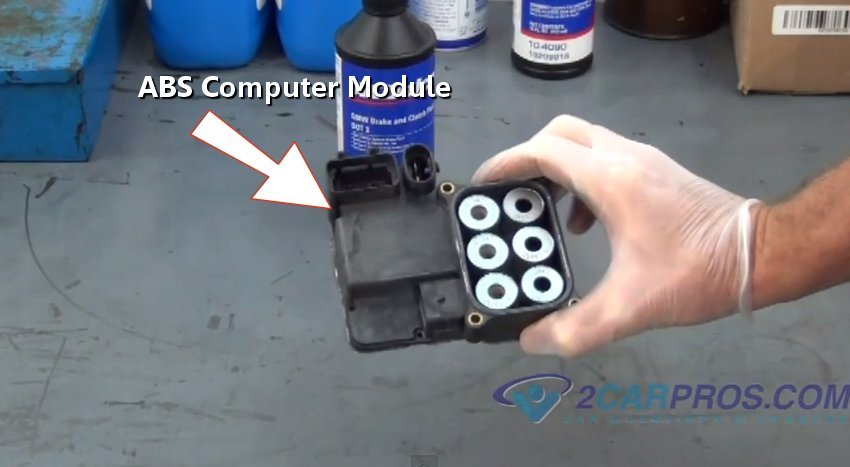
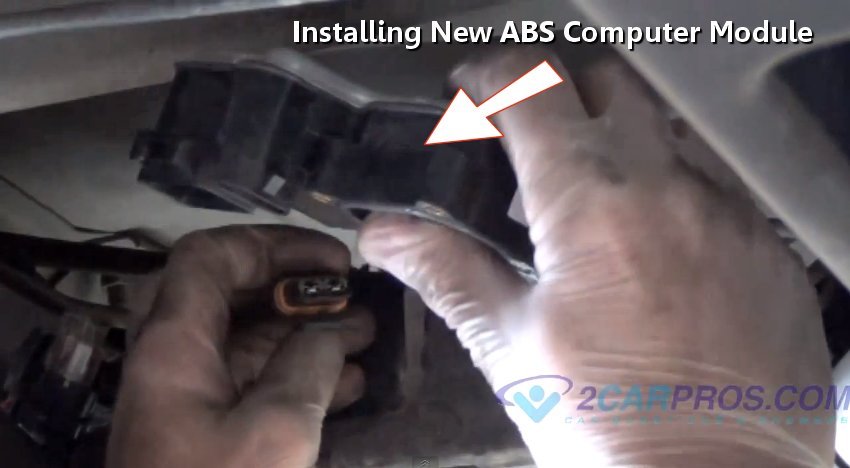
After the failed unit has been removed, match the old part to the new replacement unit, they should be an identical match. Be sure to count the number of electrical pins in each connector because there are minor variations according to what options and SUV, can or truck may have such as anti-skid options.

STEP 5
STEP 6
STEP 7
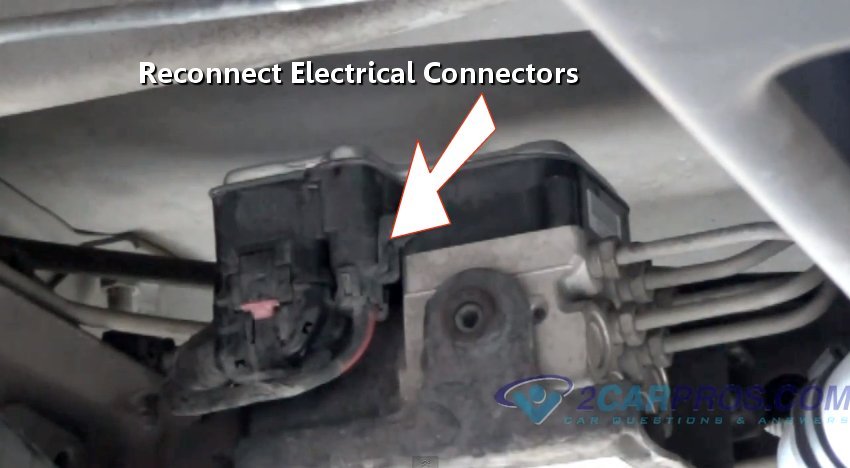
Once all the mounting bolts are tight, reconnect the electrical connectors back onto the valve assembly and make sure the connectors are clean from dirt and grime and recheck your work.
Reconnect the battery negative cable and start the car, the warning light will go off shortly after the engine is running or after you have driven the car for a short time.
No code clearing is required in most cases for American built vehicles, but some older European and Japanese models may need to be cleared using a scanner, a local garage or auto parts tore can do this for you.

If you have any question concerning this repair please visit our forum where hundreds of ABS controller module questions have already been answered.
2002 Impala:ABS Control Module Replacement
Remove the left hand fender brace, cruise control module, and air cleaner duct. Remove the electrical connector from the abs module and the 4 torx head screws that mount the module to the hydraulic unit. Do not disconnect hte brake lines from the hydraulic unit. Install new module and other componets removed for access to it. This is a plug and play module and does not require programming. The red piece will slide to one side, this allows the slide lock on the connector to be pulled out to one side. After sliding the red piece, push down on the button in the middle of the connector and slide the lock out. The screws are on the 4 corners of the module and connect it to the hydraulic unit of the abs.The lock should slide to the side opposite of where the harness comes into the connector. If there is dirt in the connector it will make it hard to slide. Try spraying wd-40 into the slide on the connector, this may help loosen it up.Once the grey slide is pulled as far toward the fender as it will go the connector falls off.
It does appear the ABS Control Module is inside the pump assembly. At this point I will assume that removing the metal cover will not expose the inner workings of the pump. I have now left about 3 ounces of flesh and 1/2 pint of blood on the fender and transmission. Once you remove the 4 screws the module will come off.
How to replace the ABS control module on a 2008 Nissan Rogue
08 Nissan-Datsun Truck Rogue 4WD L4-2.5L (QR25DE)
Electronic Brake Control Module Service and Repair, Removal and Replacement: ABS
ABS ACTUATOR AND ELECTRIC UNIT (CONTROL UNIT)
Removal and Installation
REMOVAL
CAUTION: ^ Before servicing, disconnect the battery cable from negative terminal.^ To remove brake tube, use a flare nut wrench to prevent flare nuts and brake tube from being damaged. To install, use flare nut crowfoot and torque wrench. ^ Do not apply excessive impact to ABS actuator and electric unit (control unit), such as dropping it. ^ Do not remove and install actuator by holding harness. ^ After work is completed, bleed air from brake tube.
1. Remove cowl top. 2. Disconnect ABS actuator and electric unit (control unit) connector.3. Loosen brake tube flare nuts, then remove brake tubes from ABS actuator and electric unit (control unit).4. Remove tire (front LH side).5. Remove fender protector (rear): (front LH side). 6. Remove ABS actuator and electric unit (control unit) bracket mounting nut.7. Remove ABS actuator and electric unit (control unit) from vehicle.
INSTALLATIONNote the following, and install in the reverse order of removal.
CAUTION: ^ Before servicing, disconnect the battery cable from negative terminal.^ To remove brake tube, use a flare nut wrench to prevent flare nuts and brake tube from being damaged. To install, use flare nut crowfoot and torque wrench. ^ Do not apply excessive impact to ABS actuator and electric unit (control unit), such as dropping it. ^ Do not remove and install actuator by holding harness. ^ After work is completed, bleed air from brake tube. ^ After installing harness connector in the ABS actuator and electric unit (control unit), make sure connector is securely locked.
Bleeding Brake System
CAUTION: ^ Turn the ignition switch OFF and disconnect the ABS actuator and electric unit (control unit) connector or the battery negative terminal before performing the work.^ Monitor the fluid level in the reservoir tank during the air bleeding. ^ Always use new brake fluid for refilling. Never reuse the drained brake fluid.
1. Connect a vinyl tube to the bleeder valve of the rear right brake.2. Fully depress the brake pedal 4 to 5 times.3. Loosen the bleeder valve and bleed air with the brake pedal depressed, and then quickly tighten the bleeder valve.4. Repeat steps 2 and 3 until all of the air is out of the brake line.5. Tighten the bleeder valve to the specified torque.
6. Perform steps 1 to 5 for the rear right brake ---> front left brake ---> rear left brake ---> and front right brake in order.7. Check that the fluid level in the reservoir tank is within the specified range after air bleeding.
ABS Brake Light On After Wheel Bearing Replacement
You just had a noisy wheel bearing replaced, and now your ABS brake light is on, you inspect all the ABS brake sensors, and everything looks ok, none of the sensors or wires are damaged, what could be the problem? This problem is more common than you would think, and it baffles the DIY guy trying to save a few bucks changing out a wheel bearing on their own.
Here is a possible solution to your problem; the wheel bearing you just installed is in backwards and the encoder is facing the hub, not the ABS sensor!
Reconnect the battery negative cable and start the car, the warning light will go off shortly after the engine is running or after you have driven the car for a short time.
No code clearing is required in most cases for American built vehicles, but some older European and Japanese models may need to be cleared using a scanner, a local garage or auto parts tore can do this for you.
2002 Impala:ABS Control Module Replacement
Remove the left hand fender brace, cruise control module, and air cleaner duct. Remove the electrical connector from the abs module and the 4 torx head screws that mount the module to the hydraulic unit. Do not disconnect hte brake lines from the hydraulic unit. Install new module and other componets removed for access to it. This is a plug and play module and does not require programming. The red piece will slide to one side, this allows the slide lock on the connector to be pulled out to one side. After sliding the red piece, push down on the button in the middle of the connector and slide the lock out. The screws are on the 4 corners of the module and connect it to the hydraulic unit of the abs.The lock should slide to the side opposite of where the harness comes into the connector. If there is dirt in the connector it will make it hard to slide. Try spraying wd-40 into the slide on the connector, this may help loosen it up.Once the grey slide is pulled as far toward the fender as it will go the connector falls off.It does appear the ABS Control Module is inside the pump assembly. At this point I will assume that removing the metal cover will not expose the inner workings of the pump. I have now left about 3 ounces of flesh and 1/2 pint of blood on the fender and transmission. Once you remove the 4 screws the module will come off.
How to replace the ABS control module on a 2008 Nissan Rogue
08 Nissan-Datsun Truck Rogue 4WD L4-2.5L (QR25DE)
Electronic Brake Control Module Service and Repair, Removal and Replacement: ABS
ABS ACTUATOR AND ELECTRIC UNIT (CONTROL UNIT)
Removal and Installation
REMOVAL
CAUTION:
^ Before servicing, disconnect the battery cable from negative terminal.
^ To remove brake tube, use a flare nut wrench to prevent flare nuts and brake tube from being damaged. To install, use flare nut crowfoot and torque wrench.
^ Do not apply excessive impact to ABS actuator and electric unit (control unit), such as dropping it.
^ Do not remove and install actuator by holding harness.
^ After work is completed, bleed air from brake tube.
1. Remove cowl top.
2. Disconnect ABS actuator and electric unit (control unit) connector.
3. Loosen brake tube flare nuts, then remove brake tubes from ABS actuator and electric unit (control unit).
4. Remove tire (front LH side).
5. Remove fender protector (rear): (front LH side).
6. Remove ABS actuator and electric unit (control unit) bracket mounting nut.
7. Remove ABS actuator and electric unit (control unit) from vehicle.
INSTALLATION
Note the following, and install in the reverse order of removal.
CAUTION:
^ Before servicing, disconnect the battery cable from negative terminal.
^ To remove brake tube, use a flare nut wrench to prevent flare nuts and brake tube from being damaged. To install, use flare nut crowfoot and torque wrench.
^ Do not apply excessive impact to ABS actuator and electric unit (control unit), such as dropping it.
^ Do not remove and install actuator by holding harness.
^ After work is completed, bleed air from brake tube.
^ After installing harness connector in the ABS actuator and electric unit (control unit), make sure connector is securely locked.
Bleeding Brake System
CAUTION:
^ Turn the ignition switch OFF and disconnect the ABS actuator and electric unit (control unit) connector or the battery negative terminal before performing the work.
^ Monitor the fluid level in the reservoir tank during the air bleeding.
^ Always use new brake fluid for refilling. Never reuse the drained brake fluid.
1. Connect a vinyl tube to the bleeder valve of the rear right brake.
2. Fully depress the brake pedal 4 to 5 times.
3. Loosen the bleeder valve and bleed air with the brake pedal depressed, and then quickly tighten the bleeder valve.
4. Repeat steps 2 and 3 until all of the air is out of the brake line.
5. Tighten the bleeder valve to the specified torque.
6. Perform steps 1 to 5 for the rear right brake ---> front left brake ---> rear left brake ---> and front right brake in order.
7. Check that the fluid level in the reservoir tank is within the specified range after air bleeding.
ABS Brake Light On After Wheel Bearing Replacement
You just had a noisy wheel bearing replaced, and now your ABS brake light is on, you inspect all the ABS brake sensors, and everything looks ok, none of the sensors or wires are damaged, what could be the problem?
This problem is more common than you would think, and it baffles the DIY guy trying to save a few bucks changing out a wheel bearing on their own.
Here is a possible solution to your problem; the wheel bearing you just installed is in backwards and the encoder is facing the hub, not the ABS sensor!
Here's the Deal on ABS Pickup Rings and Encoders
Old style ABS pickup rings were usually a ring of metal teeth pressed on to the axle, hub, or rotor. These metal teeth are called the pickup, and each one of the teeth are spaced evenly around the ring. There is an ABS sensor mounted at the edge of the ring and it counts or measures the spaces as the ring spins, if any of the teeth are damaged or missing, the ABS brake light will come on warning the driver of a problem.The new style ABS systems uses a magnetic encoder built into the wheel bearing, and if the wheel bearing is installed backwards with the encoder facing out, it won't take long before your ABS light is on and your stress level goes up. The sad part is, you will most likely have to replace the wheel bearing with a new one, there is only a slim chance you can remove the wheel bearing without damaging it.
Old style ABS pickup rings were usually a ring of metal teeth pressed on to the axle, hub, or rotor. These metal teeth are called the pickup, and each one of the teeth are spaced evenly around the ring. There is an ABS sensor mounted at the edge of the ring and it counts or measures the spaces as the ring spins, if any of the teeth are damaged or missing, the ABS brake light will come on warning the driver of a problem.
The new style ABS systems uses a magnetic encoder built into the wheel bearing, and if the wheel bearing is installed backwards with the encoder facing out, it won't take long before your ABS light is on and your stress level goes up. The sad part is, you will most likely have to replace the wheel bearing with a new one, there is only a slim chance you can remove the wheel bearing without damaging it.
ABS Encoders Don't Like Magnets
When handling a wheel bearing with a magnetic encoder, be sure to keep it away from all magnets especially strong magnets line the ones found on speakers. Magnets can damage the encoder ring; even the small pocket screwdriver magnet can cause damage to the encoder ring if it gets too close.Some car manufacturers make a special tool to check the encoder for damage before installing it; it's worth the extra few minutes to check the encoder before putting everything back together, better to spend a few minutes up front then to see the dreaded ABS brake light on after the job is done. I hate wasting time, because time is money! How bout you?
When handling a wheel bearing with a magnetic encoder, be sure to keep it away from all magnets especially strong magnets line the ones found on speakers. Magnets can damage the encoder ring; even the small pocket screwdriver magnet can cause damage to the encoder ring if it gets too close.
Some car manufacturers make a special tool to check the encoder for damage before installing it; it's worth the extra few minutes to check the encoder before putting everything back together, better to spend a few minutes up front then to see the dreaded ABS brake light on after the job is done. I hate wasting time, because time is money! How bout you?
Old Style ABS Brakes
If you have the old style ABS brakes with the metal ring, it's a possibility you might have damaged the ring when you replace the wheel bearing, or installed the sensor improperly. Also check the sensors for debris build up like road grime or axle grease, sometimes this can interfere with the operation of the ABS sensor. If you find any obstructions, just gently wipe it off with a shop towel and avoid using any harsh chemicals like brake clean or carburetor cleaner, these chemicals could damage the sensor or wires. Inspect the metal pickup ring very carefully; any damage to the teeth could cause the ABS warning light to come on. Check for missing teeth, broken teeth misalignment and cracks in the pickup ring. If the sensors look good and the rings are in good shape, you may have a bad sensor.
2000 Ford Expedition 2 X 2 Eddie Bower 4.6L. Troubleshoot ABS system
The ABS pump motor located under the air filter box will not shut off unless you unplug the motor or disconnect the battery. It began when I started the TK one morning and the ABS light came on and I could hear an electric motor running that I never noticed before. I drove down the road made a U turn and came back. I turned off the engine, got out and the motor was still running. No tapping, wiggling of wires or unplugging and reconnecting did any good. Any suggestions?
What you are referencing is actually the air compressor for your air ride suspension. It will run if it senses that the vehicle is not even (the purpose being " even" for load hauling) and it can continue to run, if I remember correctly, up to 40 minutes after shutting the vehicle off. You may want to have the air bags checked for a leak, or even the compressor itself (I had to replace mine about a month ago, with no problems since then), as it will continue to run like this until it eventually burns it itself out. If you want to shut the compressor off (although I would not suggest driving it like this), the switch is located behind kick panel on the passengers side (not hard to find if you look, it is labelled). Hope this helps!
The ABS module is directly below the air filter housing. The air compressor for the Air Suspension Unit is located in front of the battery (passenger side).
My ABS light came on a few months ago. I recently took it to have the ABS codes read at my local repair shop. They told me that it was the rear wheel sensor that was bad (located on top of the rear differential). After I got home and turned off the truck, I could hear something still running. I located the ABS-pump/motor under the air filter and could feel that it was ' operating' and pretty hot as well. I disconnected it to keep it from burning out. I replaced the rear wheel sensor, disconnected the battery to reset the system, then restarted the vehicle. The ABS pump still operates continuously (with or without the ignition on) and the ABS light is still illuminated. I am going to take it back to the shop tomorrow and have them reset the codes and re-scan them as well.
solution was to replace the ABS computer module which is located on top of the ABS pump motor. Found one at a local salvage yard that was from a late model Ford truck. Apparently they used the same ABS control module/pump for many years in the early to mid 2000' s. Cost was $100.00. They gave me the entire unit, which was the pump motor and the attached computer module. I removed the computer module and replaced it on my 2000 Expedition (I believe it was 4-bolts) and all has been fine for over a year now. The original problem was the rear wheel sensor, which I replaced. However, when we originally ran the diagnostics to find out what what was wrong with the ABS system, something happened to the computer, which caused the pump motor to run continuously.
Apparently the most often component that goes bad on the Ford ABS system is the rear wheel sensor. I just happened to have the bad luck of also messing up the Control module(computer) when I had it scanned/tested.
You wont have to touch the brake lines at all. Simply remove the ABS computer from the top of the ABS pump motor control unit. It should be about 4 torx screws that hold it on the top of the main unit. Disconnect the wiring harness from the computer. Re-attach the new computer control module and attach the wiring harness. No bleeding required (except possibly from your wallet). Only other advice is to disconnect the battery before - hand.
Just wanted to say thanks for your insight. I bought a ABS Pump Motor Relay, but could not find out where to replace it at. I ended up purchasing a Control Module just like you stated from the local salvage yard out of a 2001. Plugged it up last night and it works like a charm. No lights and stops just fine (always a plus!) I took the relay back to Carquest and was refunded my $91.00. Best thing. The control module was under $50.00. Thanks again.
If you have the old style ABS brakes with the metal ring, it's a possibility you might have damaged the ring when you replace the wheel bearing, or installed the sensor improperly. Also check the sensors for debris build up like road grime or axle grease, sometimes this can interfere with the operation of the ABS sensor. If you find any obstructions, just gently wipe it off with a shop towel and avoid using any harsh chemicals like brake clean or carburetor cleaner, these chemicals could damage the sensor or wires.
Inspect the metal pickup ring very carefully; any damage to the teeth could cause the ABS warning light to come on. Check for missing teeth, broken teeth misalignment and cracks in the pickup ring. If the sensors look good and the rings are in good shape, you may have a bad sensor.
2000 Ford Expedition 2 X 2 Eddie Bower 4.6L. Troubleshoot ABS system
The ABS pump motor located under the air filter box will not shut off unless you unplug the motor or disconnect the battery. It began when I started the TK one morning and the ABS light came on and I could hear an electric motor running that I never noticed before. I drove down the road made a U turn and came back. I turned off the engine, got out and the motor was still running. No tapping, wiggling of wires or unplugging and reconnecting did any good. Any suggestions?
What you are referencing is actually the air compressor for your air ride suspension. It will run if it senses that the vehicle is not even (the purpose being " even" for load hauling) and it can continue to run, if I remember correctly, up to 40 minutes after shutting the vehicle off. You may want to have the air bags checked for a leak, or even the compressor itself (I had to replace mine about a month ago, with no problems since then), as it will continue to run like this until it eventually burns it itself out. If you want to shut the compressor off (although I would not suggest driving it like this), the switch is located behind kick panel on the passengers side (not hard to find if you look, it is labelled). Hope this helps!
The ABS module is directly below the air filter housing. The air compressor for the Air Suspension Unit is located in front of the battery (passenger side).
My ABS light came on a few months ago. I recently took it to have the ABS codes read at my local repair shop. They told me that it was the rear wheel sensor that was bad (located on top of the rear differential). After I got home and turned off the truck, I could hear something still running. I located the ABS-pump/motor under the air filter and could feel that it was ' operating' and pretty hot as well. I disconnected it to keep it from burning out. I replaced the rear wheel sensor, disconnected the battery to reset the system, then restarted the vehicle. The ABS pump still operates continuously (with or without the ignition on) and the ABS light is still illuminated. I am going to take it back to the shop tomorrow and have them reset the codes and re-scan them as well.
solution was to replace the ABS computer module which is located on top of the ABS pump motor. Found one at a local salvage yard that was from a late model Ford truck. Apparently they used the same ABS control module/pump for many years in the early to mid 2000' s. Cost was $100.00. They gave me the entire unit, which was the pump motor and the attached computer module. I removed the computer module and replaced it on my 2000 Expedition (I believe it was 4-bolts) and all has been fine for over a year now. The original problem was the rear wheel sensor, which I replaced. However, when we originally ran the diagnostics to find out what what was wrong with the ABS system, something happened to the computer, which caused the pump motor to run continuously.
Apparently the most often component that goes bad on the Ford ABS system is the rear wheel sensor. I just happened to have the bad luck of also messing up the Control module(computer) when I had it scanned/tested.
You wont have to touch the brake lines at all. Simply remove the ABS computer from the top of the ABS pump motor control unit. It should be about 4 torx screws that hold it on the top of the main unit. Disconnect the wiring harness from the computer. Re-attach the new computer control module and attach the wiring harness. No bleeding required (except possibly from your wallet). Only other advice is to disconnect the battery before - hand.
Just wanted to say thanks for your insight. I bought a ABS Pump Motor Relay, but could not find out where to replace it at. I ended up purchasing a Control Module just like you stated from the local salvage yard out of a 2001. Plugged it up last night and it works like a charm. No lights and stops just fine (always a plus!) I took the relay back to Carquest and was refunded my $91.00. Best thing. The control module was under $50.00. Thanks again.
No comments:
Post a Comment